If you replace your car’s oil by yourself, you already know how much of a mess it can create. Over time, sludge and other kinds of waste begin to form inside the engine and oil pan of your car, so it’s necessary to keep them as clean as possible.
After a regular oil change, the oil pan in your car needs cleaning. To do that, you will need to gather some common household tools, detach the pan from the engine, clean it, dry it, and then put it back in its place. Failing to clean the oil pan can cause the engine to perform poorly and shorten its lifespan.
This article will help you clean the oil plate of your car in a simple and efficient way.
Table of Contents
Step 1 – Prepare the Right Tools
Before you start, you’ll first need to gather all the necessary tools for the cleaning process.
The following things can come in handy: old rags, paper towels, plastic scrapers, a pair of safety goggles, a brush, a high-pressure hose, a degreaser, a brake cleaner, and a good dishwashing liquid.
Any detergent that can break down oil should work just fine. While you might not always need all of these things, recommend having all of them by your side, just for your own peace of mind.
Step 2 – Raise and Secure Your Car

Before removing the oil pan from the engine of your car, you will need to do a few things to ensure your safety.
Raise the front part of your car and put two jack stands under it to support it, chock the rear wheels, and make sure to apply the parking brake. The car needs to be raised enough so that you can comfortably work under it.
Safety First
Be aware that getting under a car that is just supported by jack stands isn’t secure enough and it can also lead to serious injuries. That’s why it’s also absolutely necessary to use wheel chocks and apply the parking brake to prevent the wheels from rolling.
Step 3 – Place a Catch Pan and Start Detaching the Oil Pan

Now put a catch pan under the oil pan and use either a wrench or a ratchet and socket to disconnect the drain plug.
The catch pan or the auto-drip pan is a tool that is located on the bottom part of your car and its purpose is to gather all the oil that is draining from above while the oil change is being done. Its second purpose is to collect old oil during the oil change process.
After that, take a rubber mallet and lightly strike the oil pan on one side. Some oil pans are more difficult to remove because they are attached to the engine with mounting bolts that you will need to unscrew first.
Don’t Use Metal Tools
Since this part is made of soft aluminum and is very prone to damage, you should not use any metal tools for this.
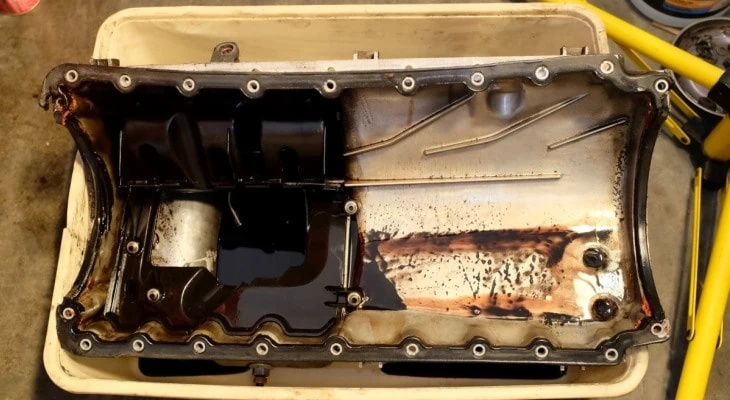
Step 4 – Scrape and Wipe the Pan
After you have removed the pan, you will find oil on its inner surfaces that you cannot get rid of just by washing it with some liquid. The inner surface is completely flat and you can easily remove all the excess oil from it with a plastic scraper.
You will also notice some uneven surfaces on the pan, which you should wipe with paper towels. You can also get some more paper towels to clean the scrapped oil residue from the inner part of the pan.
Step 5 – Soak It and Wash It Thoroughly

After scraping and wiping the pan, it’s time to proceed to the next step. You can spray it with a brake cleaner, leave it for a couple of minutes, and then wipe it off with some paper towels or old rags.
Another thing you can do is to take a large container and fill it with hot water and a strong detergent, which I found even more effective. Just make sure to mix it thoroughly before putting the pan in it and leaving it to soak.
After this, you need to remove the pan from the soapy water and wash it with a high-pressure hose. When applying pressurized cleaning, water is released from the hose at an extremely high speed and its sheer force is able to remove all the remaining dirt. I also recommend taking a brush and scrubbing the pan while rinsing it with water.
Keep in mind that any leftover detergent can be bad for your new engine oil, so you must rinse out all of it. After you have made sure there is no leftover detergent, you can move on to the next step.
Step 6 – Dry It and Put It Back in Its Place

Once all that greasy oil residue and detergent have been removed, dry it with paper towels or a cloth. Before attaching it back to the engine block, check if the oil pan is dry, and then put it back in its place.
Why It’s Important to Keep Your Oil Pan Clean
The more miles you clock on your car, the more often you will need to change the oil and clean the oil pan. This is because, after some period of driving, sludge and debris start to form in the engine and oil pan of your vehicle.
Some people just change the motor oil without removing and thoroughly cleaning the oil pan. It’s a mistake because the engine performance will start to deteriorate over time. However, if you follow this guide on removing the oil pan and cleaning out all the residue oil from it, your engine won’t perform poorly and hopefully last much longer.
Final Thoughts
Not everyone needs to go to a mechanic shop and spend a lot of money in order to clean an oil pan. You just need to collect a few common household tools and follow a couple of easy steps.
If you want to maintain your car by yourself, it is crucial to know how to detach its oil pan from the engine, clean it meticulously and put it back in its place. I hope that this guide can help you keep your car in its peak condition.